ńŞőÚŁóŠłĹń╗ČňşŽń╣áŔ«ęšöĘŠłĚń╗ÄńŞÇńެŔíĘňŹĽŠĆÉń║ĄŠľçŠťČňł░šĘőň║ĆńŞş´╝îň╣ÂńŞöŠŐŐšŤŞňů│ń┐íŠü»ń┐ŁňşśňťĘsessionńŞşŃÇé
webšÜäňĚąńŻťňÄčšÉć
ňťĘň╗║šźőŔíĘňŹĽňëŹńŻáÚťÇŔŽüń║ćŔžúńŞÇńŞőwebŠś»ŠÇÄń╣łňĚąńŻťšÜä´╝îŔÖŻšäÂńŞŹňĄ¬ň«îŠĽ┤´╝îńŻćŠś»ń╣čŔâŻňŞ«ňŐęńŻáŠëżňç║ńŞÇń║ŤÚöÖŔ»»´╝îŔÇîńŞöňłŤň╗║ŔíĘňŹĽń╣čń╝ÜŠŤ┤ňŐáň«╣ŠśôŃÇé
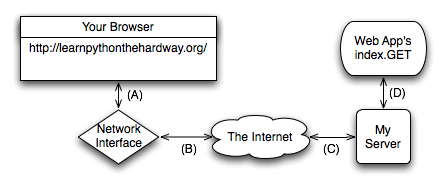
ŠłĹń╗Čń╗ÄńŞÇńެňŤżň╝Çňžő´╝îŔ┐ÖńެňŤżň▒ĽšĄ║ń║ćwebŔ»ĚŠ▒éńŞŹňÉîÚâĘňłćňĺîń┐íŠü»ŠÁüňÉĹ´╝Ü
ŠłĹňŐáń║ćńŞÇń║Ťš║┐ňĺîňşŚŠ»ŹŠŁąň▒ĽšĄ║Ŕ»ĚŠ▒éšÜäŔ┐çšĘő´╝Ü
- ńŻáňťĘŠÁĆŔžłňÖĘŔżôňůąšŻĹňŁÇhttp://learnpythonthehardway.org/´╝îšäÂňÉÄňĆĹÚÇüŔ»ĚŠ▒é´╝îŔ»ĚŠ▒éÚÇÜŔ┐çAš║┐ňł░ŔżżńŻášÜäšöÁŔäĹšÜ䚯Ś╗ťŠÄąňĆúŃÇé
- Ŕ»ĚŠ▒éňćŹÚÇÜŔ┐çBš║┐Ŕ┐ŤňůąŔő▒šë╣šŻĹ´╝îÚÇÜŔ┐çCš║┐Ŕ󟊝ŹňŐíňÖĘŠÄąŠöÂňł░ŃÇé
- webšĘőň║ĆÚÇÜŔ┐çDš║┐ňĆľňżŚŔ»ĚŠ▒é´╝îpythonń╗úšáüŔ┐ÉŔíîindex.GET.
- ńŻćŠťëreturnšÜ䊌ÂňÇÖ´╝îŔ┐öňŤ×ń┐íŠü»ÚÇÜŔ┐çDš║┐Ŕ┐öňŤ×ňł░ŠťŹňŐíňÖĘŃÇé
- ŠťŹňŐíňÖĘňćŹÚÇÜŔ┐çCš║┐ňĆĹÚÇüňŤ×ň║öń┐íŠü»ŃÇé
- ÚÇÜŔ┐çBš║┐šŻĹš╗ťŠÄąňĆúŠÄąŠöÂňł░ń┐íŠü»´╝îÚÇÜŔ┐çAš║┐ňĆĹÚÇüňł░ŠÁĆŔžłňÖĘŃÇé
- ŠťÇňÉÄ´╝îńŻášÜäŠÁĆŔžłňÖĘň░▒ňĆ»ń╗ąň▒ĽšĄ║ňŤ×ň║öšÜäš╗ôŠ×ťŃÇé
ńŞőÚŁóŠś»ńŞÇń║ŤňŞŞšöĘšÜäŔ»ŹŠ▒çŔíĘ´╝Ü
ŠÁĆŔžłňÖĘ - Ŕ┐ÖńެńŞŹšöĘŔžúÚçŐń║ćňÉž´╝îIE´╝îšüźšőÉŔ┐Öń║ŤńŞťŔą┐ň░▒Šś»ń║ćŃÇé
ňť░ňŁÇ - ÚÇÜňŞŞŠîçńŞÇńެURL´╝îň░▒ňâĆhttp://learnpythonthehardway.org/Ŕ┐ÖŠáĚšÜäńŞťŔą┐´╝îhttpŠś»ńŻáŔŽüńŻ┐šöĘšÜäňŹĆŔ««´╝îň░▒Šś»ÔÇťŔÂůŠľçŠťČń╝áŔżôňŹĆŔ««ÔÇŁŃÇéńŻáń╣čňĆ»ń╗ąŔ»ĽŔ»Ľftp://ibiblio.ort´╝îŔ┐ÖŠś»ÔÇťŠľçń╗Âń╝áŔżôňŹĆŔ««ÔÇŁ´╝îňÉÄÚŁóšÜälearnpythonthehardway.orgň░▒Šś»ňččňÉŹ´╝ľŔÇůŔ»┤Šś»ńŞÇńެňąŻŔ«░ňżŚňť░ňŁÇ´╝îŔ┐Öńެňť░ňŁÇŠśáň░äńŞÇńެIPňť░ňŁÇŃÇ銝ÇňÉÄ´╝îURLŔ┐śŠťëńŞÇńެŔĚ»ňżä´╝öňŽéhttp://learnpythonthehardway.org/book/ńŞşšÜä/book/´╝îň«âň»╣ň║öńŞÇńެŠľçń╗ŠłľŔÇůńŞÇń║ŤŔÁäŠ║É´╝îŔ┐śń╝ÜŠťëňżłňĄÜňůÂń╗ľÚâĘňłć´╝îńŞŹŔ┐çŔ┐Öń║ŤŠś»ńŞ╗ŔŽüŠłÉňłćŃÇé
ÚôżŠÄą - ńŞÇŠŚŽŠÁĆŔžłňÖĘščąÚüôń║ćńŻáńŻ┐šöĘhttpňŹĆŔ««´╝ŹňŐíňÖĘŃÇüňĺîŔÁäŠ║É´╝îÚéúń╣łň░▒ŔŽüň╗║šźőńŞÇńެÚôżŠÄąŃÇéŠÁĆŔžłňÖĘń╝ÜŔ«ęŠôŹńŻťš│╗š╗čŠëôň╝ÇńŞÇńެšź»ňĆú´╝îÚÇÜňŞŞŠś»80šź»ňĆúŃÇéňŻôšź»ňĆúŠëôň╝ÇňÉÄ´╝îš│╗š╗čń╝ÜňŤ×ń╝áńŞÇńެš▒╗ń╝╝Šľçń╗šÜäńŞťŔą┐š╗ÖńŻášĘőň║Ć´╝îŔ┐ÖńެŠľçń╗šÜäńŻťšöĘň░▒Šś»ňťĘńŻášÜäšöÁŔäĹňĺŹňŐíňÖĘÚŚ┤ňĆĹÚÇüňĺîŠÄąŠöŠĽ░ŠŹ«ŃÇéńŻ┐šöĘhttp://localhost:8080šÜäŔ»Ł´╝îŠÁĆŔžłňÖĘŔ«┐ÚŚ«šÜ䊜»ŠťČŠť║´╝îńŻ┐šöĘšÜäšź»ňĆúŠś»8080ŠŤ┐ń╗úń║ćÚ╗śŔ«ĄšÜä80ŃÇéńŻáňĆ»ń╗ąŔ«┐ÚŚ«http://learnpythonthehardway.org´╝Ü80/´╝îňĺîŠ▓íňŐáňÉÄÚŁóšÜäšź»ňĆúŠś»ńŞÇŠáĚšÜä´╝îňŤáńŞ║Ú╗śŔ«Ąň░▒Šś»Ŕ«┐ÚŚ«80šź»ňĆúŃÇé
Ŕ»ĚŠ▒é - ńŻášÜäŠÁĆŔžłňÖĘÚÇÜŔ┐çňť░ňŁÇŔ┐׊ĹňÉÄ´╝îÚéúń╣łńŻáÚťÇŔŽüń╗ÄŠťŹňŐíňÖĘŔ»ĚŠ▒éńŻáÚťÇŔŽüšÜäńŞťŔą┐ŃÇéňŽéŠ×ťňť░ňŁÇňÉÄŠťë/book/´╝îÚéúń╣łńŻáŠâ│ŔŽüňĆľňżŚbookŠľçń╗ŠłľŔÇůŔÁäŠ║ÉŃÇéÚÇÜňŞŞŠťŹňŐíňÖĘńŻ┐šöĘ/book/index.htmlŔ┐Öńެšťčň«×šÜ䊾çń╗´╝Ĺń╗ČńŞŹňů│Š│ĘňůĚńŻôŠś»ŠÇÄń╣łňüÜšÜä´╝Ĺń╗ČŔŽüščąÚüôŠłĹń╗ČňĆĹšöčńŞÇńެŔ»ĚŠ▒éš╗ÖŠťŹňŐíňÖĘ´╝ŹňŐíňÖĘŔ┐öňŤ×pythonń╗úšáüšö芳ɚÜäńŞťŔą┐ŃÇé
ŠťŹňŐíňÖĘ - ŠťŹňŐíňÖĘŠîçšÜ䊜»ŠÁĆŔžłňÖĘňĆŽńŞÇšź»ŠÄąŠöÂŔ»ĚŠ▒éň╣ÂŔ┐öňŤ×Šľçń╗ŠłľŔÇůŔÁäŠ║ÉšÜäńŞťŔą┐ŃÇéňĄžÚâĘňłćwebŠťŹňŐíňÖĘňƬŠś»ňĆĹšö芾çń╗´╝îňƬŠś»ńŞ╗ŔŽüšÜäŠÁüÚçĆ´╝îńŻćŠś»ńŻáŠś»šöĘpythonš╗äň╗║ńŞÇńެŠťŹňŐíňÖĘ´╝îň«âščąÚüôŠÇÄń╣łŠÄąŠöÂŔ»ĚŠ▒é´╝îň╣ÂńŞöŔ┐öňŤ×ňşŚšČŽńŞ▓ŃÇéńŻáňĆ»ń╗ąňüçň«ÜŠś»ń╝áŔżôń║抾çń╗´╝îňůÂň«×ňƬŠś»ńŞÇń║Ťń╗úšáüŃÇé
ňôŹň║ö - Ŕ┐ÖŠś»ŠťŹňŐíňÖĘŔ┐öňŤ×š╗ÖŠÁĆŔžłňÖĘšÜäHTMLń╗úšáüŃÇéŔ┐Öń║Ťňćůň«╣ňîůňÉźńŞÇń║Ťšë╣ň«ÜšÜäňĄ┤ÚâĘń┐íŠü»´╝îŔ┐ÖŠáĚŠÁĆŔžłňÖʊ돚čąÚüôŔÄĚňĆľšÜ䊜»ń╗Çń╣łš▒╗ň×őšÜäňćůň«╣ŃÇéń╗ąńŻášÜäwebšĘőň║ĆńŞ║ńżő´╝îńŻáňĆĹÚÇüŠŚÂńŞÇŠáĚšÜäńŞťŔą┐´╝îňîůŠőČňĄ┤ÚâĘń┐íŠü»´╝îňƬńŞŹŔ┐çŔ┐Öń║Ťń┐íŠü»Šś»pythonń╗úšáüšö芳ɚÜäŃÇé
ńŞŐÚŁóŔ┐Öń║ŤňĆ»ń╗ąňŞ«ňŐęńŻáŠŤ┤ňąŻšÜäšÉćŔžúŠťČŔŐéšÜäňćůň«╣´╝îňŽéŠ×ťńŻáŔ┐śńŞŹŠś»ňżłšÉćŔžúńŞŐÚŁóšÜäňćůň«╣´╝îňÄ╗ŠëżńŞÇń║ŤŔÁ䊾Öń║ćŔžúń║ćŔžúŃÇéňĆ»ń╗ąň»╣šůžńŞŐÚŁóšÜäňŤż´╝îŠŐŐ50šźášÜäń╗úšáüň»╣ň║öňł░šŤŞň║öšÜäÚâĘňłć´╝îŔ┐ÖŠáĚńŻáň░▒ŔâŻňĄžŔç┤ŠśÄšÖŻň«âšÜäňĚąńŻťňÄčšÉćń║ćŃÇé
ŔíĘňŹĽŠś»ŠÇÄń╣łňĚąńŻťšÜä
ňşŽń╣áŔíĘňŹĽŠťÇňąŻšÜäňŐ׊│Ľň░▒Šś»ňćÖńŞÇńެŔíĘňŹĽšĘőň║Ć´╝îń┐«Šö╣ńŻášÜäapp.pyŠľçń╗´╝Ü
import web

urls = (
    '/hello', 'Index'
)

app = web.application(urls, globals())

render = web.template.render('templates/')

class Index(object):
    def GET(self):
        form = web.input(name="Nobody")
        greeting = "Hello, %s" % form.name
        return render.index(greeting = greeting)

if __name__ == "__main__":
    app.run()
šöĘCTRL+CňüťŠşóšĘőň║Ć´╝îšäÂňÉÄÚ珊ľ░ňÉ»ňŐĘň«â´╝îšöĘŠÁĆŔžłňÖĘŔ«┐ÚŚ«http://localhost:8080/helloŃÇéńŻáňĆ»ń╗ąšťőňł░Ŕżôňç║Šś»ÔÇťI just wanted to say Hello, Nobody.ÔÇŁŠö╣ňĆśňť░ňŁÇńŞ║http://localhost:8080/hello?name=Frank´╝îńŻáń╝Üšťőňł░ÔÇťHello´╝îFrankÔÇŁŃÇé
Ŕ«ęŠłĹń╗ČšťőšťőňłÜŠëŹňüÜń║ćń╗Çń╣ł´╝Ü
- ńŻ┐šöĘweb.inputń╗ÄŠÁĆŔžłňÖĘňĆľňżŚŠĽ░ŠŹ«´╝îňłÜň╝ÇňžőÚçîÚŁóŠťëńŞÇńެÚ╗śŔ«ĄňÇ╝´╝îňŻôŠťë?name=FrankšÜ䊌ÂňÇÖ´╝îFrankŠŤ┐ŠŹóŠÄëÚ╗śŔ«ĄňÇ╝ŃÇé
- šöĘform.nameŠŤ┐ŠŹógreetingÚçîÚŁóšÜäňÇ╝ŃÇé
- ňůÂń╗ľšÜäňĺîń╗ąňëŹň░▒ńŞÇŠáĚń║ćŃÇé
ńŻáń╣čňĆ»ń╗ąńŻ┐šöĘňĄÜńެňĆ銼░´╝öňŽéňť░ňŁÇŠö╣ńŞ║http://localhost:8080/hello?name=Frank&greet=Hola´╝îń╗úšáüńŞşŠö╣ŠłÉŔ┐ÖŠáĚ´╝Ü
greeting = "%s, %s" % (form.greet, form.name)
ňŽéŠ×ťňÄ╗ŠÄë&greet=HolaŔ«┐ÚŚ«´╝îńŻáń╝ÜňżŚňł░ńŞÇńެÚöÖŔ»»´╝îňŤáńŞ║greetŠ▓튝ëÚ╗śŔ«ĄňÇ╝ŃÇéšÄ░ňťĘŠłĹń╗Čňł░šĘőň║ĆńŞşš╗Öń╗ľňŐáńŞÇńެšę║šÜäÚ╗śŔ«ĄňÇ╝ňÉž´╝îň╣ÂńŞöňłĄŠľşńŞÇńŞőń╗ľŠś»ňÉŽŠťëňÇ╝´╝Ü
form = web.input(name="Nobody", greet=None)

        if form.greet:
            greeting = "%s, %s" % (form.greet, form.name)
            return render.index(greeting = greeting)
        else:
            return "ERROR: greet is required"
ňłŤň╗║HTMLŔíĘňŹĽ
ňťĘURLńŞşŔżôňůąňĆ銼░Š»öŔżâÚ║╗šâŽ´╝Ĺń╗ČÚťÇŔŽüńŞÇńެPOSTŔíĘňŹĽ´╝îŔ┐ÖńެHTMLŠľçń╗ÂńŞşňîůňÉź<form>Šáçšşż´╝îŠáçšşżńŞşňîůňÉźšöĘŠłĚÚťÇŔŽüňĆĹÚÇüšÜäń┐íŠü»ŃÇé
ňłŤň╗║ńŞÇńެňîůňÉźŔíĘňŹĽšÜ䊾çń╗Âtemplates/hello_form.html´╝Ü
<html>
    <head>
        <title>Sample Web Form</title>
    </head>
<body>

<h1>Fill Out This Form</h1>

<form action="/hello" method="POST">
    A Greeting: <input type="text" name="greet">
    <br/>
    Your Name: <input type="text" name="name">
    <br/>
    <input type="submit">
</form>

</body>
</html>
ń┐«Šö╣app.pyŠľçń╗´╝Ü
import web

urls = (
    '/hello', 'Index'
)

app = web.application(urls, globals())

render = web.template.render('templates/')

class Index(object):
    def GET(self):
        return render.hello_form()

    def POST(self):
        form = web.input(name="Nobody", greet="Hello")
        greeting = "%s, %s" % (form.greet, form.name)
        return render.index(greeting = greeting)

if __name__ == "__main__":
    app.run()
ÚçŹňÉ»webšĘőň║Ć´╝îšäÂňÉÄšöĘŠÁĆŔžłňÖĘŔ«┐ÚŚ«ńŞÇńŞőŃÇé
šÄ░ňťĘńŻáń╝Üšťőňł░ńŞÇńެŔíĘňŹĽ´╝îŔ«ęńŻáŔżôňůąŠČóŔ┐ÄŔ»ŹňĺîňÉŹňşŚ´╝îňŻôńŻášé╣ňç╗ŠĆÉń║ĄŠîëÚĺ«šÜ䊌ÂňÇÖ´╝îň░▒ń╝Üňç║šÄ░ŠČóŔ┐ÄÚíÁÚŁó´╝îŔÇîńŻášÜäURLňť░ňŁÇŔ┐śŠś»http://localhost:8080/helloŃÇé
ňťĘhello_form.htmlńŞşšÜä<form action="/hello" method="POST">ňĹŐŔ»ëŠÁĆŔžłňÖĘ´╝Ü
- ń╗ÄformńŞşŠöÂÚŤćšöĘŠłĚŔżôňůąŃÇé
- ÚÇÜŔ┐çPOSTŠľ╣ň╝ĆňĆĹšö芼░ŠŹ«š╗ÖŠťŹňŐíňÖĘŃÇé
- ňĆĹÚÇüšÜäňť░ňŁÇŠś»/hello
ńŻáń╝Üšťőňł░<input>ńŞşšÜänameňĺîGETŠľ╣ň╝ĆšÜ䚍Şň»╣ň║öŃÇé
Šľ░šÜäń╗úšáüňüÜń║ćń╗Çń╣ł´╝Ü
- ňůłń╗ąGETšÜ䊾╣ň╝ĆŔ«┐ÚŚ«/hello´╝îń╗úšáüÚçîÚŁóŠś»Ŕ«┐ÚŚ«ń║ćhello_form.htmlŠľçń╗ÂŃÇé
- ňťĘŠÁĆŔžłňÖĘńŞşŠĚ╗ňŐáń║ćńŞÇńެform´╝îŔ┐ÖńެŔíĘňŹĽŔ«żň«Üń║ćňĆĹšö芼░ŠŹ«šÜ䊾╣ň╝Ćš╗ÖPOSTŃÇé
- webšĘőň║ĆŔ┐ÉŔíîPOSTÚâĘňłćšÜäń╗úšáüňĄäšÉćňĆĹÚÇüŔ┐犣ąšÜ䊼░ŠŹ«ŃÇé
- POSTňâĆń╗ąňëŹńŞÇŠáĚňĆĹÚÇüŠĽ░ŠŹ«ňł░helloÚíÁÚŁóŃÇé
ňťĘindex.htmlÚíÁÚŁóńŞşŠĚ╗ňŐáńŞÇńެŔ┐öňŤ×šÜäŔ┐׊Ĺ´╝îŔ«ęńŻáňĆ»ń╗ąŔ┐öňŤ×ňł░ŔíĘňŹĽÚíÁÚŁóŃÇé
ňłŤň╗║ńŞÇńެňŞâň▒ÇŠĘ튣┐
ńŞőńŞÇńެš╗âń╣áńŞş´╝Ĺń╗ČŔŽüŠŐŐŠŞŞŠłĆŠöżŔ┐ŤŠŁą´╝îŔ┐ÖŠáĚń╝ÜŠťëňżłňĄÜHTMLÚíÁÚŁóŔŽüňćÖ´╝îŔ┐ÖŠáĚňżłÚ║╗šâŽ´╝îň╣ŞŔ┐ÉšÜ䊜»´╝Ĺń╗ČňĆ»ń╗ąňłŤň╗║ńŞÇńެňŞâň▒ÇŠĘ튣┐´╝îňĆ»ń╗ąŔ«ęňůÂń╗ľÚíÁÚŁóňîůňÉźšŤŞňÉîšÜäňĄ┤ÚâĘňĺîň░żÚâĘŠľçń╗ÂŃÇéńŞÇńެňąŻšÜäšĘőň║ĆňĹśŔŽüňçĆň░ĹÚçŹňĄŹŃÇé
Šö╣ňĆśindex.htmlŠľçń╗ŠłÉŔ┐ÖŠáĚ´╝Ü
$def with (greeting)

$if greeting:
    I just wanted to say <em style="color: green; font-size: 2em;">$greeting</em>.
$else:
    <em>Hello</em>, world!
ŠŐŐhello_form.htmlŠö╣ŠłÉńŞőÚŁóŔ┐ÖŠáĚ´╝Ü
<h1>Fill Out This Form</h1>

<form action="/hello" method="POST">
    A Greeting: <input type="text" name="greet">
    <br/>
    Your Name: <input type="text" name="name">
    <br/>
    <input type="submit">
</form>
ŠłĹń╗ČňüÜšÜäň░▒Šś»ňÄ╗ŠÄëń║ćŠëÇŠťëÚíÁÚŁóÚâŻńŞÇŠáĚšÜäňĄ┤ÚâĘňĺîň░żÚâĘŃÇéšäÂňÉÄň揊Ě╗ňŐáŔ┐Öń╣łńŞÇńެÚíÁÚŁótemplates/layout.html´╝Ü
$def with (content)

<html>
<head>
    <title>Gothons From Planet Percal #25</title>
</head>
<body>

$:content

</body>
</html>
Ŕ┐ÖńެŠľçń╗šťőŔÁĚŠŁąňâĆŠĘ튣┐ŃÇéň«âń╗ÄňůÂń╗ľÚíÁÚŁóňĆľňżŚcontent´╝îšäÂňÉÄňîůňÉźŔ┐ŤŠŁąŃÇéŠ│ĘŠäĆ$:contentšÜäšöĘŠ│Ľ´╝îňĺîňůÂń╗ľŠĘ튣┐ňĆśÚçĆńŞŹňĄ¬ńŞÇŠáĚŃÇé
ŠťÇňÉÄŠłĹń╗ČŠö╣ńŞÇńŞőwebšĘőň║Ć´╝Ü
render = web.template.render('templates/', base="layout")
Ŕ┐Öň░▒ňĹŐŔ»ëń║ćlpthw.webńŻ┐šöĘlayout.htmlńŻťńŞ║ňč║šíÇŠĘ튣┐Šľçń╗ÂŃÇéÚçŹňÉ»šĘőň║ĆšťőšťőŠĽłŠ×ťňÉžŃÇé
ńŞ║ŔíĘňŹĽňćÖŔç¬ňŐĘňÁőŔ»ĽšöĘńżő
ŠÁőŔ»ĽwebšĘőň║ĆňƬŔŽüňłĚŠľ░ŠÁĆŔžłňÖĘň░▒ňĆ»ń╗ąń║ć´╝îńŞŹŔ┐犳Ĺń╗ČŠś»šĘőň║ĆňĹśňśŤ´╝îńŞ║ń╗Çń╣łńŞŹňćÖńŞÇńެš«ÇňŹĽšÜäŠÁőŔ»Ľń╗úšáüňĹóŃÇé
ňťĘbinńŞşňłŤň╗║ńŞÇńެ__init__.pyŠľçń╗ÂŃÇéŔ┐ÖŠáĚpythonň░▒ń╝ÜŔ«ĄńŞ║binŠś»ńŞÇńެšŤ«ňŻĽń║ćŃÇé
ňłŤň╗║tests/tools.pyŠľçń╗´╝îňŐáňůąńŞőÚŁóšÜäń╗úšáü´╝Ü
from nose.tools import *
import re

def assert_response(resp, contains=None, matches=None, headers=None, status="200"):

    assert status in resp.status, "Expected response %r not in %r" % (status, resp.status)

    if status == "200":
        assert resp.data, "Response data is empty."

    if contains:
        assert contains in resp.data, "Response does not contain %r" % contains

    if matches:
        reg = re.compile(matches)
        assert reg.matches(resp.data), "Response does not match %r" % matches

    if headers:
        assert_equal(resp.headers, headers)
šäÂňÉÄňĆ»ń╗ąš╝ľňćÖńŻášÜäŔç¬ňŐĘňÁőŔ»Ľń╗úšáüń║ć´╝îň╗║šźőŠľçń╗Âtests/app_tests.py:
from nose.tools import *
from bin.app import app
from tests.tools import assert_response

def test_index():
    # check that we get a 404 on the / URL
    resp = app.request("/")
    assert_response(resp, status="404")

    # test our first GET request to /hello
    resp = app.request("/hello")
    assert_response(resp)

    # make sure default values work for the form
    resp = app.request("/hello", method="POST")
    assert_response(resp, contains="Nobody")

    # test that we get expected values
    data = {'name': 'Zed', 'greet': 'Hola'}
    resp = app.request("/hello", method="POST", data=data)
    assert_response(resp, contains="Zed")
ŠťÇňÉÄńŻ┐šöĘnosetestsŠÁőŔ»ĽšĘőň║Ć´╝Ü
root@he-desktop:~/python/projects/gothonweb# nosetests
.
----------------------------------------------------------------------
Ran 1 test in 0.192s
OK
ŠłĹň░▒Šś»ŠŐŐapp.pyŠĘíňŁŚÚâŻň»╝ňůąŔ┐ŤŠŁą´╝îšäÂňÉÄŠëőňŐĘŔ┐ÉŔíîŔ┐ÖńެšĘőň║Ć´╝îlpthw.webŠťëńެAPIšöĘŠŁąňĄäšÉćŔ»ĚŠ▒é´╝Ü
app.request(localpart='/', method='GET', data=None, host='0.0.0.0:8080',
            headers=None, https=False)
ńŻáňĆ»ń╗ąŠŐŐURLńŻťńŞ║šČČńŞÇńެňĆ銼░´╝îń┐«Šö╣ÚçîÚŁóšÜäńŞťŔą┐´╝îŔ┐ÖŠáĚň░▒ńŞŹšöĘňÉ»ňŐĘwebŠťŹňŐíňÖĘ´╝îńŻáň░▒ňĆ»ń╗ąŔç¬ňŐĘŠÁőŔ»Ľń║ćŃÇé
ńŻáŔŽüšöĘtests.toolsńŞşšÜäassert_responseň篊Ľ░ŠŁąÚ¬îŔ»üňôŹň║ö´╝Ü
assert_response(resp, contains=None, matches=None, headers=None, status="200")
Ŕ┐Öńެň篊Ľ░ňîůŠőČŠî║ňĄÜńŞťŔą┐´╝îŔç¬ňĚ▒šáöšęÂńŞÇńŞőňÉžŃÇé
ňťĘapp_tests.pyńŞş´╝Ĺń╗Čňůłší«ň«Ü/Ŕ┐öňŤ×ńŞÇńެ404ÚöÖŔ»»ŃÇéňŤáńŞ║Ŕ┐Öńެňť░ňŁÇŠś»ńŞŹňşśňťĘšÜäŃÇéšäÂňÉÄŠúÇŠčąń║ć/helloňťĘGETňĺîPOSTšÜäŔ»ĚŠ▒éŔ⯊şúňŞŞňĚąńŻťŃÇéŔ┐Öń║Ťń╗úšáüňżłňąŻŠçéšÜäŃÇé
ňŐáňłćš╗âń╣á
- ń║ćŔžúŠŤ┤ňĄÜHTMLšÜäščąŔ»ć´╝îŔ«żŔ«íńŞÇńެŠŤ┤ňąŻšÜäňŞâň▒ÇŃÇé
- šáöšęÂńŞÇńŞőŠÇÄń╣łńŞŐń╝ኾçń╗´╝îŔ»ĽšŁÇńŞŐń╝áńŞÇńެňŤżšëçšäÂňÉÄń┐Łňşśňł░šŤ«ňŻĽńŞşŃÇé
- Šëżňł░HTTP RFCŠľçń╗ÂÚśůŔ»╗ńŞÇńŞőŃÇé
- Šëżń║║ňŞ«ńŻáŔ«żšŻ«ńŞÇńެŠťŹňŐíňÖĘ´╝öňŽéApache, Nginx, ŠłľŔÇůthttpdŃÇé
- ňĄÜňłŤň╗║ńŞÇń║ŤwebšĘőň║ĆŃÇéńŻáň║öŔ»ąń╗öš╗ćÚśůŔ»╗web.pyńŞşňů│ń║Äń╝ÜŔ»ŁšÜäňćůň«╣ŃÇéŔ┐ÖŠáĚńŻáŔâŻňĄčŠśÄšÖŻŠÇÄń╣łń┐ŁňşśšöĘŠłĚšŐŠÇüń┐íŠü»ŃÇé
ňłćń║źňł░´╝Ü


šŤŞňů│ŠÄĘŔŹÉ
learn-python-the-hard-wayńŞşŠľçšëł´╝îoňč║šíÇňşŽń╣ápython´╝ü||ÚÜĆŠëőńŞŐń╝ኜ»šžŹšżÄňżĚ
Shaw is the author of the popular online books Learn Python the Hard Way, Learn Ruby the Hard Way, and Learn C the Hard Way. He is also the creator of several open source software projects like ...
Learn-Python-3-the-Hard-Way.pdf
Learn Python The Hard Way, 2nd Edition Ŕő▒Šľçšëł ň▒×ń║ÄšőČň«ÂňłÂńŻť ňÄčňłŤ PDFŠá╝ň╝ĆšÜäń╣őňëŹńŞÇšŤ┤ńŞŐń╝áńŞŹń║ć´╝îšÄ░ňťĘš╗łń║ÄňĆ»ń╗ąń║ćhttp://download.csdn.net/source/3501806´╝î ń╣čňĆ»ń╗ąňÄ╗ŠłĹšÜ䚯ŚŤśńŞőŔŻŻ DBank´╝Ü...
Learn Python the Hard Way
learn python the hard way ň«×ńżőń╗úšáü
Learn Python the Hard Way, 3rd Edition
learn python the hard way.
Learn Python the Hard Way ńŞşŠľçńŞëšëł Learn Python the Hard Way ńŞşŠľçńŞëšëł
In Learn Python 3 the Hard Way, Zed Shaw taught you the basics of Programming with Python 3. Now, in Learn More Python 3 the Hard Way, youÔÇÖll go far beyond the basics by working through 52 ...
Learn Python The Hard Way(3rd) Ŕő▒ŠľçŠŚáŠ░┤ňŹ░pdf šČČ3šëł pdfŠëÇŠťëÚíÁÚŁóńŻ┐šöĘFoxitReaderňĺîPDF-XChangeViewerŠÁőŔ»ĽÚâŻňĆ»ń╗ąŠëôň╝Ç ŠťČŔÁäŠ║ÉŔŻČŔŻŻŔ笚ŻĹš╗ť´╝îňŽéŠťëńżÁŠŁâ´╝îŔ»ĚŔüöš│╗ńŞŐń╝áŔÇůŠłľcsdnňłáÚÖĄ ŠťČŔÁäŠ║ÉŔŻČŔŻŻŔ笚ŻĹš╗ť´╝îňŽéŠťëńżÁŠŁâ´╝îŔ»Ě...
Learn Python the Hard Way´╝łňîůŠőČńŞşŠľçňĺîŔő▒Šľç´╝ë´╝îńŞŹÚöÖšÜäpythonŠĽÖšĘő
You Will Learn Python!
Ŕ┐ÖŠťČń╣Žń╗ąń╣áÚóśšÜ䊾╣ň╝Ćň╝Ľň»╝Ŕ»╗ŔÇůńŞÇŠşąńŞÇŠşąňşŽń╣áš╝ľšĘő´╝îń╗Äš«ÇňŹĽšÜäŠëôňŹ░ńŞÇšŤ┤Ŕ«▓ňł░ň«îŠĽ┤Úí╣šŤ«šÜäň«×šÄ░´╝îŔ«ęňłŁňşŽŔÇůń╗Äňč║šíÇšÜäš╝ľšĘőŠŐÇŠť»ňůąŠëő´╝ǚ╗łńŻôÚ¬îňł░ŔŻ»ń╗Âň╝ÇňĆĹšÜäňč║ŠťČŔ┐çšĘőŃÇé ŠťČń╣Žš╗ôŠ×äÚŁ×ňŞŞš«ÇňŹĽ´╝îňů▒ňîůŠőČ52ńެń╣áÚóś´╝îňůÂńŞş26ńެŔŽćšŤľń║ćŔżôňůą/Ŕżôňç║...
Learn Python 3 The Hard Way . pdf epub azw3 https://learnpythonthehardway.org/python3/ ňÄčňžőŠľçń╗Šś»azw3šëłŠťČ´╝îpdfňĺîepubšëłŠťČŠś»ń╗Äazw3šëłŠťČŔŻČŠŹóšö芳ÉŃÇé Learn Python 3 the Hard Way now uses Python 3.6. IÔÇÖve ...
learn python 3 the hard way provides an easy step towards complicated programming in python 3.
Learn Python The Hard Way´╝łšČĘňŐ׊│ĽňşŽpython´╝ë ňÄčń╣Žń╗úšáü
Learn Python The Hard Way - 2011.pdf